Kinect V2を使って、Windows 8.1+Visual Studio 2013を使ってソフトを開発するために必要なH/WとS/WはKinect for Windows V2をWindows 8.1パソコンに接続で説明した通りです。
特に、SDKはhttps://www.microsoft.com/en-us/download/details.aspx?id=44561から無料でダウンロード出来ます。
ここではKinect Studio 2.0とVisual Gesture Builderを使ってgdaファイル、gbdファイルを作成する方法、手順を説明します。
Kinect Studio v2.0
Kinect本体をパソコンに接続します。
SDK Browserを起動します。
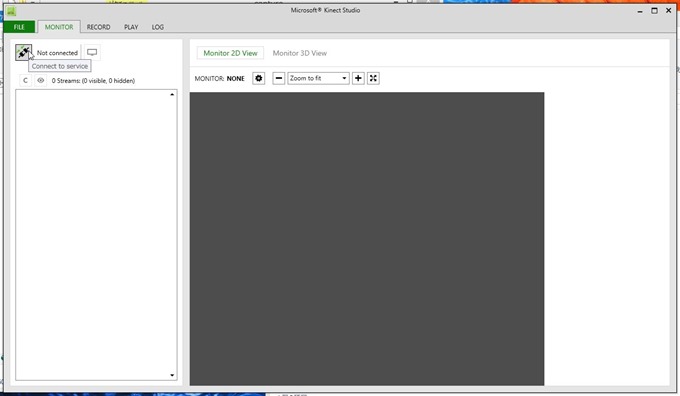
SDK BrowserからKinect Studioを起動します。
左上の[Not connected]となっているボタンを押して[Connected]にします。
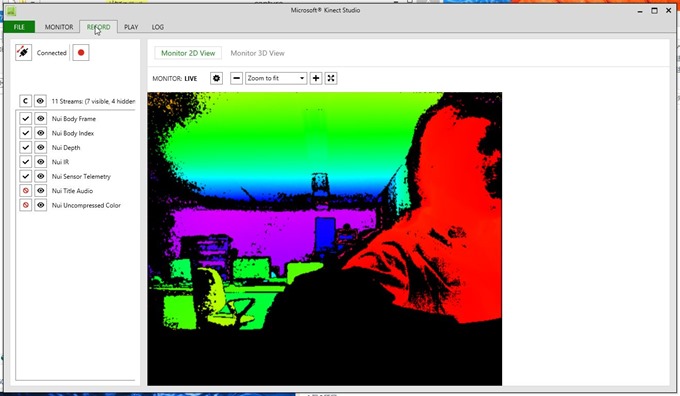
このまま「Record」タブに移動します。
左上の赤いボタンを押すと、Kinectセンサーを使って動作を録画するようになります。
上記の例の場合、
- Nui Body Frame
- Nui Body Index
- Nui Depth
- Nui iR
- Nui Sensor Telemetry
のデータをキャプチャーします。
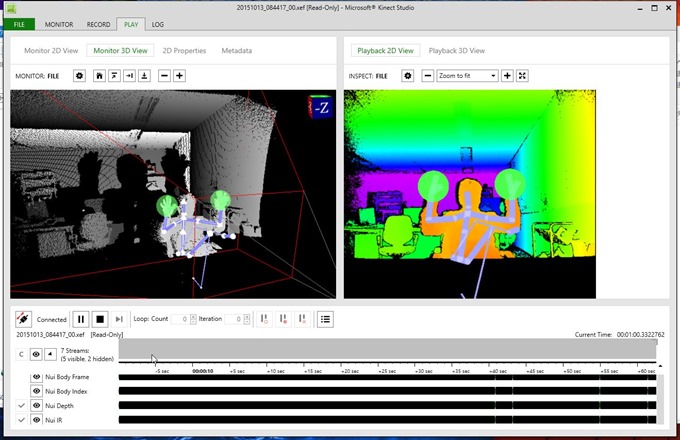
今回は両手をパーで上げて「手を挙げた」状態のジェスチャーを登録します。
録画を保存して「PLAY」タブで再生してみます。
グー、チョキ、パーによって色が変わるのでKinectセンサーで識別していることが分かります。
録画ファイルはC:\Users\(ユーザー名)\Documents\Kinect Studio\Repositoryの下にxefという拡張子で保存されています。
xefはeXtended Event Filesの意味のようです。
Visual Gesture Builder
次にジェスチャーをVisual Gesture Builderを使って登録します。ジェスチャーには種類が次の2個あります。
- Discrete
- Continuous
Discreteは、はっきりしたジェスチャーでboolでTrueまたはFalseの値が返されます。
例えば、「両手を上げる」という動作の場合、両手を下げている状態から上げている途中の状態が重要ではなく、両手を上げた結果の状態のみが重要な場合、Discreteを選択します。
一方、Continuousは、経過に注目したジェスチャーでfloatで0から1の値が返されます。
例えば、両手を上げている途中の状態が重要な場合は、Continuousを選択します。
今回は、両手をパーで上げた「手を挙げた」状態のジェスチャーなので、Discreteを選択します。
SDK Browserを起動します。
SDK BrowserからVisual Gesture Builderを起動します。
Visual Gesture Builderの[File]⇒[New Solution]で新しいソリューションを開きます。
今回は、test.vgbsln (Visual Gesture Builder Solution)ファイルとして保存します。
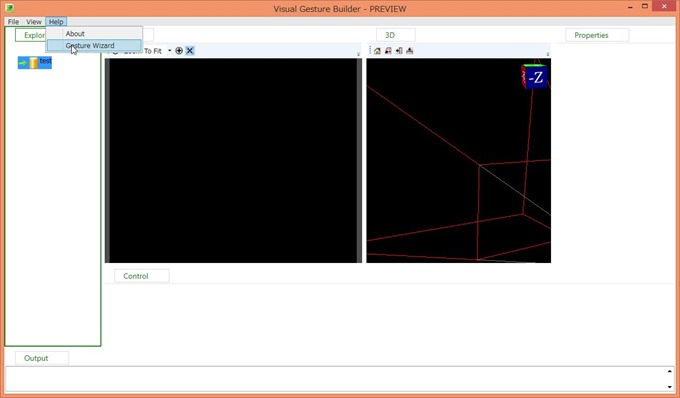
[Help]⇒[Gesture Wizard]を開きます。
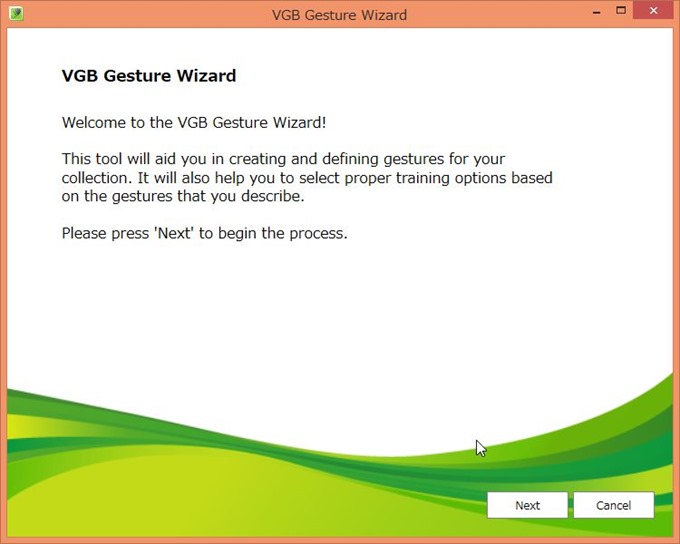
VGB Gesture Wizardが開きました。
[Next]を押します。Welcome to the VGB Gesture Wizard!
This tool will aid you in creating and defining gestures for your
collection. It will also help you to select proper training options based
on the gestures that you describe.Please press 'Next' to begin the process.
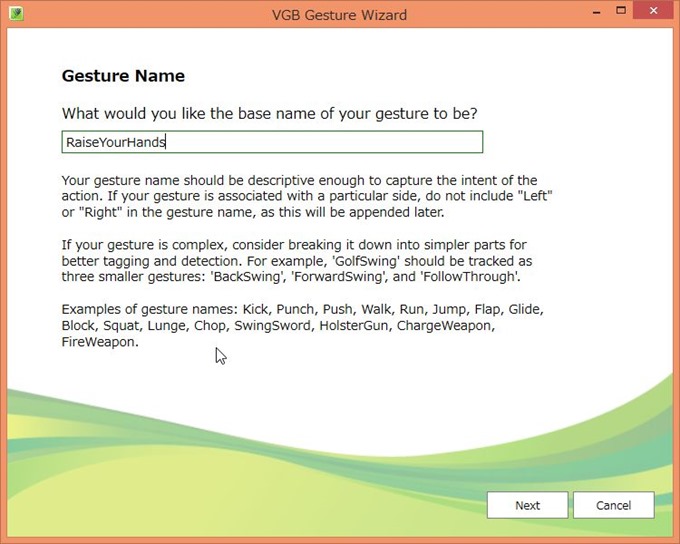
Gesture Nameとして、「RaiseYourHands」と入力します。
[Next]を押します。What would you like the base name of your gesture to be?
Your gesture name should be descriptive enough to capture the intent of the
action. If your gesture in associated with a particular side, do not include "Left"
or "Right" in the gesture name, as this will be appended later.If your gesture in complex, consider breaking it down into simpler parts for
better tagging and detection. For example, 'GoIfSwing' should be traced as
three smaller gestures: 'BackSwing', 'ForwardSwing', and 'FollowThrough'.Examples of gesture names: Kick, Punch, Push, Walk, Run, Jump, Flap, Glide,
Block, Squat, Lunge, Chop, SwingSword, HosterGun, ChargeWeapon,
FireWeapon.
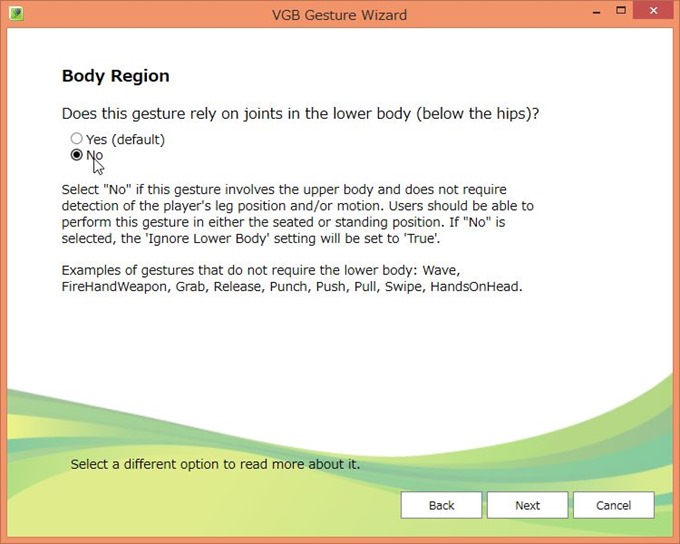
Body Regionが開きました。
Does this gesture rely on joints in the lower body (below the hips)?
Yes(default)
NoSelect "No" if this gesture involves the upper body and does not require
detection of the player's leg position and/or motion. Users should be able to
perform this gesture in either the seated or standing position. If "No" is
selected, the 'Ignore Lower Body' setting will be se to 'True'Examples of gestures that do not require the lower body: Wave,
FireHandWeapon, Grab, Release, Punch, Push, Pull, Swipe, HandsOnHead.
下半身を使わないジェスチャーの場合、Noを選択して[Next]を押します。
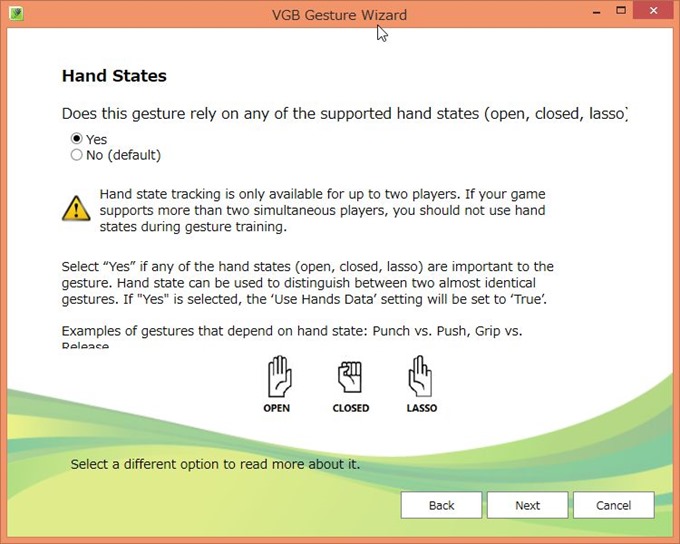
Hand Statesが開きました。
Does this gesture rely on any of the supported hand states (open, closed, lasso)
Yes
No (default)Hand state tracking is only available for up to two players. If your game
supports more than two simultaneous players, you should not use hand
states during gesture training.Select "Yes" if any of the hand states (open, closed, lasso) are important to the
gesture. Hand state can be used to distinguish between two almost identical
gestures. If "Yes" is selected, the 'Use Hands Data' setting will be set to 'True'.Examples of gestures that depend on hand state: Punch vs. Push, Grip vs.
Release.
グー、チョキ、パーの手の形を見るので、Yesを選択して[Next]を押します。
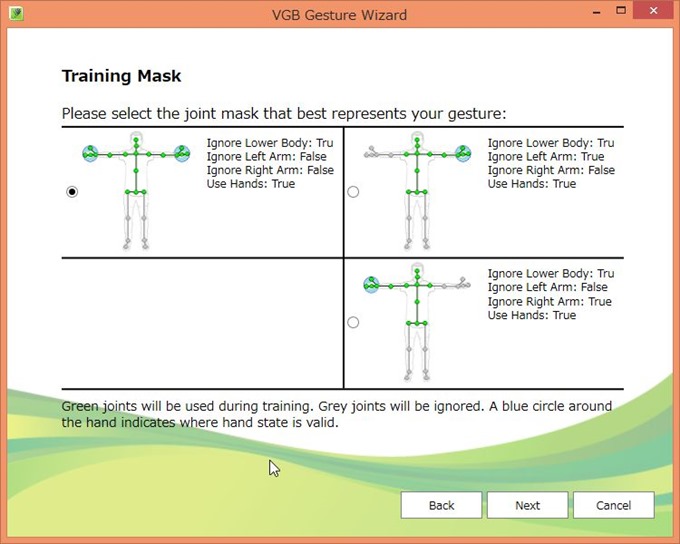
Training Maskが開きました。
Please select the joint mask that best represents your gesture:
左上のジェスチャーを選択します。
[Next]を押します。Ignore Lower Body: Tru
Ignore Left Arm: False
Ignore Right Arm: False
Use Hands: False
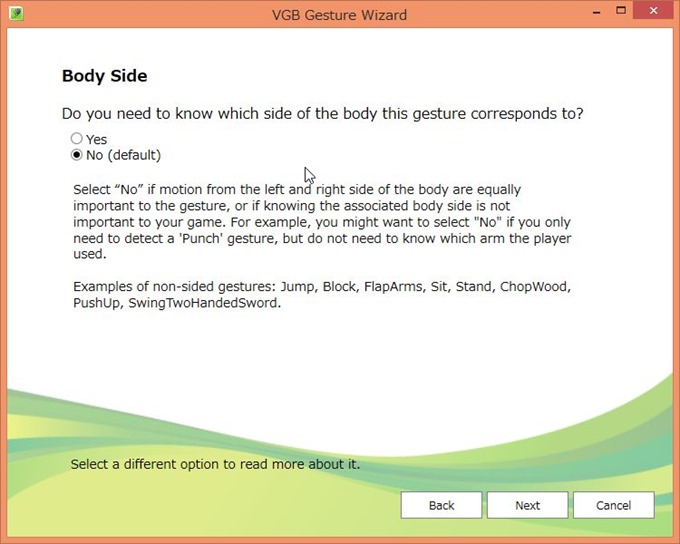
Body Sideが開きました。
Do you need to know which side of the body this gesture corresponds to?
Yes
No (default)Select "No" if motion from the left and right side of the body are equally
important to the gesture, or if knowing the associated body side is not
important to your game. For example, you might want to select "No" if you only
need to detect a 'Punch' gesture, but do not need to know which arm the player
used.Examples of non-sided gestures: Jump, Block, FlapArms, Sit, Stand, ChopWood,
PushUp, SwingTwoHandedSword.
体の側面は重要でないので、[Next]を押します。
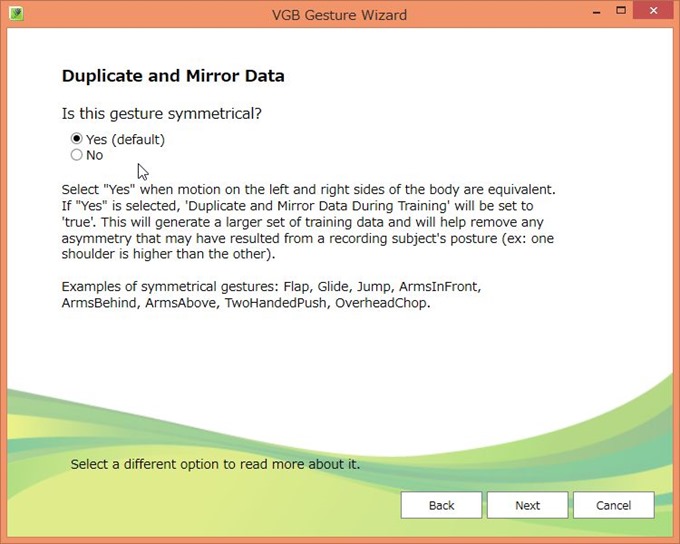
Duplicate and Mirror Dataが開きました。
Is this gesture symmetrical?
Yes (default)
NoSelect "Yes" when motion on the left and right sides of the body are equivalent.
If "Yes" is selected, 'Duplicate and Mirror Data During Training' will be set to
'true'. This will generate a larger set of training data and will help remove any
asymmetry that may have resulted from a recording subject's posture (ex: one
shoulder is higher than the other).Examples of symmetrical gestures: Flap, Glide, Jump, ArmsInFront,
ArmsBehind, ArmsAbove, TwoHandedPush, OverheadChop.
ジェスチャーが左右対称なので、Yesを選択して[Next]を押します。
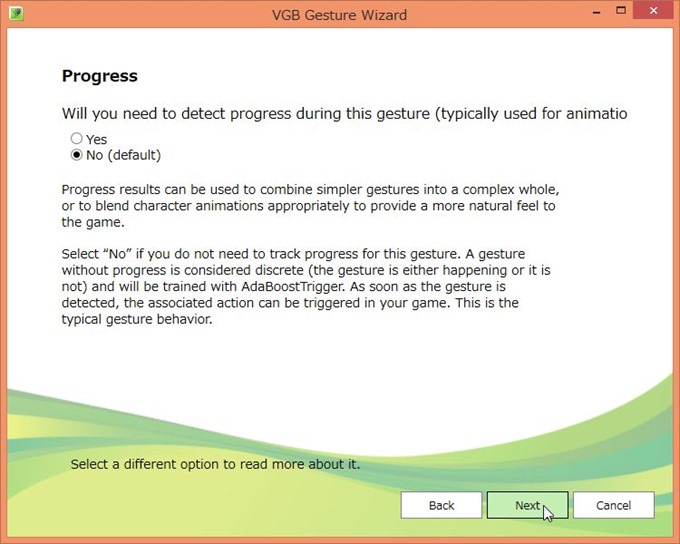
Progressが開きました。
Will you need to detect progress during this gesture (typically used for animation)
Yes
No (default)Progress results can be used to combine simpler gesture into a complex whole,
or to blend character animations appropriately to provide a more natural feel to
the game.Select "No" if you do not need to track progress for this gesture. A gesture
without progress is considered discrete (the gesture is either happening or it is
not) and will be trained with AdaBoostTrigger. As soon as the gesture is
detected, the associated action can be triggered in your game. This is the
typical gesture behavior.
動いている途中の動作が必要な場合はYesですが、必要がないのでNoを選択して、[Next]を押します。
ここでNoを選択するとDiscreteのみのジェスチャーになります。
Yesを選択するとContinuousのジェスチャーを作成することが可能になります。
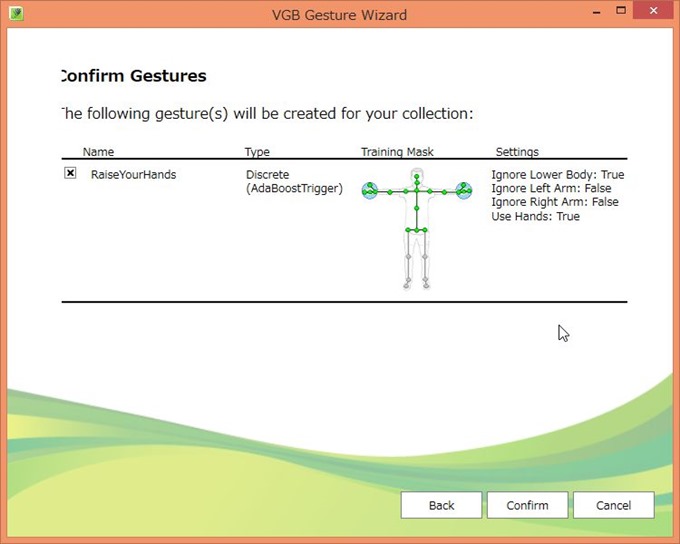
Confirm Gesturesが開きました。
The following gesture(s) will be created for your collection:
Name
RaiseYourHandsType
DiscreteSettings
Ignore Lower Body: True
Ignore Left Arm: False
Ignore Right Arm: False
Use Hands: True
TypeがDiscreteであることを確認して、[Confirm]を押します。
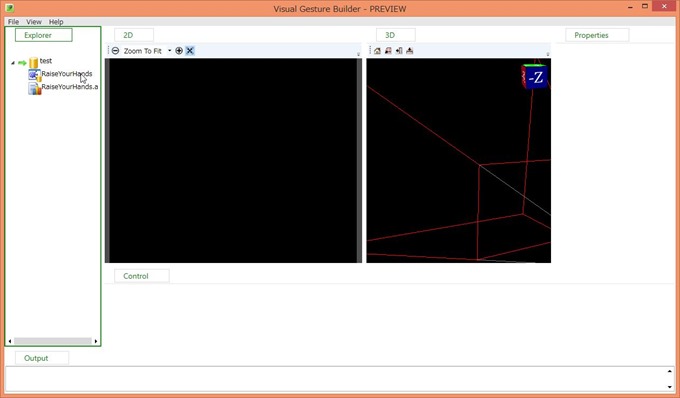
RaiseYourHands.vgbprojという名前で[保存(S)]を押します。
[RaiseYourHands]でマウスの右クリックを押して[Add Clip]を選択します。
先ほど、Kinect Studioで作成したxefファイルを選択します。
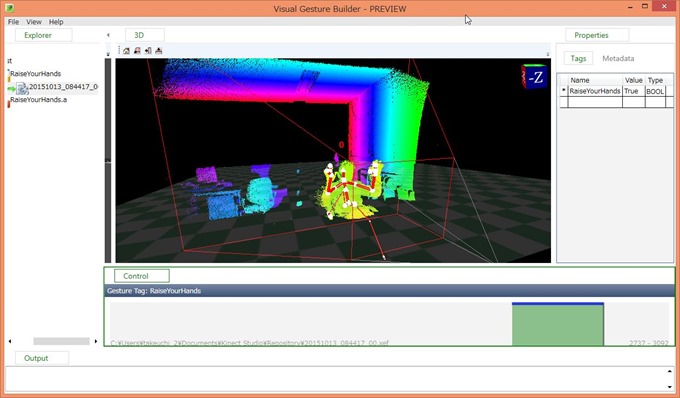
右下の進行状況を表すプログレスバーをマウスで操作します。
両手をパーで上げているジェスチャーになっていれば、[Shift]と[右矢印]を押します。
Shiftと右矢印を押している間は、ジェスチャーがTrueとなっている状態で、図のように色が変わります。
そして、両手をパーで上げている状態でなくなれば、[Enter]を押して確定します。
選択を削除するには、同様に[Shift]と[右矢印]で選択してから[Del]を押します。
該当のジェスチャー中では、右上に表示されているTagsの[RaiseYourHands]がTrueになっていることを確認します。
上記では1回のみのジェスチャーになっていますが、実際は複数回、同じ動作を行うことが望ましいです。
[File]⇒[Save]を押して保存します。
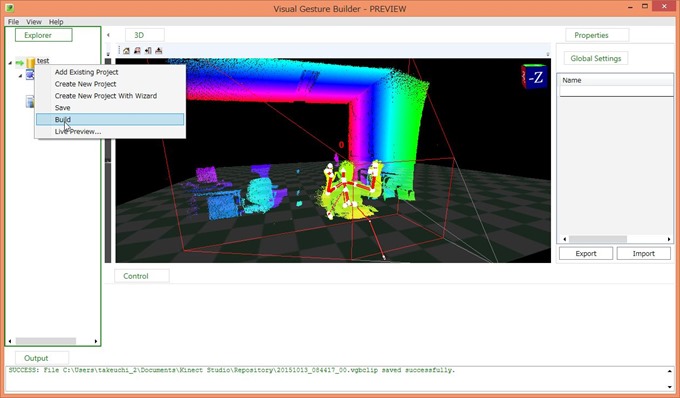
testを選択して、マウスの右クリックを押してメニューから[Build]を押します。
ビルドして作成するデータベースとしてtest.gbd(Visual Gesture Builder Database)とします。
ビルドを行い最後に「SUCCESS: The build completed successfully and has been saved to xxx\test.gbd」と表示されれば、ビルドに成功です。
test.gbdというジェスチャーデータベースが作成されました。
試しにtest.gbdをテストしてみます。
[File]⇒[List Preview]を押してダイアログから「test.gbd」を選択します。
この図のように、両手をパーで手を挙げた時だけtest.gbdが反応すれば正解です。
プログラム上では該当のジェスチャーを行った時だけTrueが返されます。
Kinect V2で開発するための書籍
Kinect V2で開発するために参考となる日本語の書籍はほとんどありません。
例えば、私が買った下記の2冊は内容がプアでほとんど参考になりませんでした。
例えば、本の中身がそのまま下記のURLに載っていたりします。
http://thinkit.co.jp/story/2014/12/09/5478
この程度の本の内容なら、上記のホームページを眺めるだけで十分かなと思います。
唯一以下の本は、Visual Gesture Builderの使い方も載っているので、買うならこの本の方がよいです。
この本の中身は以下の内容が載っています。
- Kinect for Windows v2の概要
- インストールと環境構築
- 基本ストリーム
- 応用機能
- ツールの利用方法
- Kinect for Windows SDK v2をUnityで使う
- SDK v2を使ったアプリケーション例
- Kinectで学ぶ数学
- Kinect for Windows v2の限界を突破する
最後まで読んでいただきありがとうござました。
この記事が気に入っていただけたらシェアしてくれると嬉しいです。











コメント