Redmine (レッドマイン) は、今話題のタスク管理システムです。
カテゴリとして、ITS(Issue Tracking System)/BTS(Bug Tracking System) として分類されることがあります。
今回、CentOS 7.0にRedmine 3.2をインストールしたので、インストール方法をメモしました。
目次
Redmineとは

Redmineはオープンソースのタスク管理ツールです。
WEBベースのオンプレミスなシステムとしてインストールすることが可能です。
trac,jira,redmineの3つのシステムについてGoogleトレンドで人気動向を調べてみました。
長らくtracが人気でしたが、最近はjiraやredmineに人気が移っているように見えます。
特にjiraは、tracを追い抜く勢いです。
JIRA(ジラ)はアトラシアンが開発した企業向けプロプライエタリ・ソフトウェアであり、主にバグトラッキングや課題管理、プロジェクト管理に用いられます。
アトラシアンという会社は日本人にはなじみが薄いですが、オーストラリアのソフトウェア会社であり、ウェブベースのホスティングサービス Bitbucket なども有名です。
JIRAは非商業団体には無償提供されますが、それ以外は無償では使えません。
よって、今回はRedmineを試してみることにしました。
Redmineのインストール方法
前提として以下のソフトがインストールされているとします。
CentOS 7.0.1406
# cat /etc/redhat-release
CentOS Linux release 7.0.1406 (Core)
Apache 2.4.6
# httpd -v
Server version: Apache/2.4.6 (CentOS)
Server built: Mar 12 2015 15:07:19
MariaDB 5.5.40
# mysqladmin version
mysqladmin Ver 9.0 Distrib 5.5.40-MariaDB, for Linux on x86_64
Copyright (c) 2000, 2014, Oracle, Monty Program Ab and others.
この状態で、Redmine 3.2をインストールしてみます。
SELinuxをオフにする
SELinuxはオフにしておきます。
/etc/selinux/configを編集します。
|
1 2 3 |
SELINUX=enforcing ↓ SELINUX=disabled |
SELinuxの設定については以下にまとめました。
ポート80の解放
また、WEBで接続するためにHTTPでポート80を開けておきます。
/etc/firewalld/zones/public.xml
を編集します。
|
1 2 3 4 5 6 7 8 9 |
<?xml version="1.0" encoding="utf-8"?> <zone> <short>Public</short> <description>For use in public areas. You do not trust the other computers on networks to not harm your computer. Only selected incoming connections are accepted.</description> <service name="dhcpv6-client"/> <service name="ssh"/> <service name="http"/> <service name="https"/> </zone> |
CentOS 7のファイアウォールの設定については以下にまとめました。
関連ソフトのインストール
ImageMagickとヘッダファイル、日本語フォントのインストールを行います。
依存関係のパッケージも多数インストールされます。
|
1 |
# yum install ImageMagick ImageMagick-devel ipa-pgothic-fonts |
RedmineはRubyで書かれた言語なのでRuby本体もインストールします。
|
1 2 3 4 |
# yum install ruby ruby-devel # ruby -v ruby 2.0.0p598 (2014-11-13) [x86_64-linux] |
Redmineが使用するGemを一括インストールするためのツール、bundlerをインストールします。
|
1 2 3 4 5 6 |
# gem install bundler Fetching: bundler-1.11.2.gem (100%) Successfully installed bundler-1.11.2 Parsing documentation for bundler-1.11.2 Installing ri documentation for bundler-1.11.2 1 gem installed |
データベースのセットアップ
Redmineが使用するデータベースをセットアップします。
|
1 2 3 4 5 6 7 8 9 10 11 12 13 14 15 16 17 18 19 20 21 |
# mysql -u root -p Enter password: Welcome to the MariaDB monitor. Commands end with ; or \g. Your MariaDB connection id is 2372 Server version: 5.5.40-MariaDB MariaDB Server Copyright (c) 2000, 2014, Oracle, Monty Program Ab and others. Type 'help;' or '\h' for help. Type '\c' to clear the current input statement. MariaDB [(none)]> create database redmine default character set utf8; Query OK, 1 row affected (0.05 sec) MariaDB [(none)]> grant all on redmine.* to redmine@localhost identified by '*****'; Query OK, 0 rows affected (0.39 sec) MariaDB [(none)]> flush privileges; Query OK, 0 rows affected (0.12 sec) MariaDB [(none)]> quit Bye |
Redmineのインストール
Redmine本体をダウンロードします。
|
1 2 3 4 |
# curl -O http://www.redmine.org/releases/redmine-3.2.0.tar.gz % Total % Received % Xferd Average Speed Time Time Time Current Dload Upload Total Spent Left Speed 100 2245k 100 2245k 0 0 541k 0 0:00:04 0:00:04 --:--:-- 541k |
redmine-3.2.0.tar.gz というファイルがダウンロードされます。
|
1 |
# tar xvf redmine-3.0.0.tar.gz |
で展開した後、
|
1 |
# mv redmine-3.2.0 /var/lib/redmine |
のように移動して、
/var/lib/redmine
がredmineのルートフォルダになるようにします。
/var/lib/redmine/config/database.yml.example
をコピーして
/var/lib/redmine/config/database.yml
を作成します。
database.yml
を編集してデータベースのユーザー名とパスワードを設定します。
/var/lib/redmine/config/configuration.yml.example
をコピーして
/var/lib/redmine/config/configuration.yml
を作成します。
configuration.yml
は、メール設定だけなので、以下を有効化するだけでよいです。
|
1 2 3 4 5 6 7 |
email_delivery: delivery_method: :smtp smtp_settings: address: "localhost" port: 25 rmagick_font_path: /usr/share/fonts/ipa-mincho/ipam.ttf |
/var/lib/redmine
のアクセス権を設定します。
|
1 |
# chown -R apache:apache /var/lib/redmine |
2016/06/03 追記:Subversion対応のために、アクセス権限は、apacheではなくてredmineユーザーに変更しました。
|
1 2 |
# useradd redmine # chown -R redmine:redmine /var/lib/redmine |
Gemパッケージのインストール
Redmineで使用するGemをインストールします。
Redmineのインストールディレクトリで以下のコマンドを実行します。
|
1 2 3 4 |
# bundle install --without development test --path vendor/bundle gcc -I. -I/usr/include -I/usr/include/ruby/backward -I/usr/include -I. -fPIC -O2 -g -pipe -Wall -Wp,-D_FORTIFY_SOURCE=2 -fexceptions -fstack-protector-strong --param=ssp-buffer-size=4 -grecord-gcc-switches -mtune=generic -fPIC -fvisibility=hidden -m64 -o autolink.o -c autolink.c make: gcc: コマンドが見つかりませんでした make: *** [autolink.o] エラー 127 |
うーん。
makeしたりgccしたりするんですね。
開発環境がいるようです。
とりあえず、
gcc
のコンパイラーをインストールします。
|
1 |
# yum install gcc |
これででいけるかと思いきや以下のエラーが発生しました。
|
1 2 |
An error occurred while installing mysql2 (0.3.17), and Bundler cannot continue. Make sure that `gem install mysql2 -v '0.3.17'` succeeds before bundling. |
どうやら、
mysql-devel
が必要なようです。
|
1 |
# yum install mysql-devel |
これで、無事にGemパッケージはインストール出来ました。
Redmineの初期設定とデータベースのテーブル作成
Redmineの初期設定とデータベースのテーブルの作成を行います。
|
1 2 3 |
# bundle exec rake generate_secret_token # RAILS_ENV=production bundle exec rake db:migrate |
PassengerのApache用のモジュールをインストールします。
|
1 2 3 4 5 |
# gem install passenger --no-rdoc --no-ri Fetching: passenger-5.0.23.gem (100%) Building native extensions. This could take a while... Successfully installed passenger-5.0.23 1 gem installed |
Passengerのインストールを行います。
|
1 2 3 4 5 6 7 8 9 10 11 12 13 14 15 16 17 18 19 20 21 22 23 24 25 26 27 28 29 30 31 32 33 34 35 36 37 38 39 40 41 42 43 44 45 46 47 48 49 50 51 52 53 54 55 56 57 58 59 60 61 62 63 64 65 66 67 68 69 70 |
# passenger-install-apache2-module Welcome to the Phusion Passenger Apache 2 module installer, v5.0.23. This installer will guide you through the entire installation process. It shouldn't take more than 3 minutes in total. Here's what you can expect from the installation process: 1. The Apache 2 module will be installed for you. 2. You'll learn how to configure Apache. 3. You'll learn how to deploy a Ruby on Rails application. Don't worry if anything goes wrong. This installer will advise you on how to solve any problems. Press Enter to continue, or Ctrl-C to abort. Which languages are you interested in? Use <space> to select. If the menu doesn't display correctly, press '!' > (*) Ruby ( ) Python ( ) Node.js ( ) Meteor -------------------------------------------- Checking for required software... * Checking for C compiler... Found: yes Location: /bin/cc * Checking for C++ compiler... Found: no * Checking for Curl development headers with SSL support... Found: no Error: Cannot find the `curl-config` command. * Checking for Zlib development headers... Found: yes Location: true * Checking for Apache 2... Found: yes Location of httpd: /sbin/httpd Apache version: 2.4.6 * Checking for Apache 2 development headers... Found: no * Checking for Rake (associated with /usr/bin/ruby)... Found: yes Location: /usr/bin/ruby /usr/local/bin/rake * Checking for OpenSSL support for Ruby... Found: yes * Checking for RubyGems... Found: yes * Checking for Ruby development headers... Found: yes Location: /usr/include/ruby.h * Checking for rack... Found: yes * Checking for Apache Portable Runtime (APR) development headers... Found: no * Checking for Apache Portable Runtime Utility (APU) development headers... Found: no Some required software is not installed. But don't worry, this installer will tell you how to install them. Press Enter to continue, or Ctrl-C to abort. |
なんで、「好きな言語は?」って聞かれるんだろう?。。。
やはり、開発環境が足りないようです。
以下をインストールします。
|
1 |
# yum install gcc-c++ curl-devel httpd-devel |
これでようやくインストール出来そうです。
|
1 2 3 4 5 6 7 8 9 10 11 12 13 14 15 16 17 18 19 20 21 22 |
# passenger-install-apache2-module ・・・ ・・・ ・・・ -------------------------------------------- Almost there! Please edit your Apache configuration file, and add these lines: LoadModule passenger_module /usr/local/share/gems/gems/passenger-5.0.23/buildout/apache2/mod_passenger.so <IfModule mod_passenger.c> PassengerRoot /usr/local/share/gems/gems/passenger-5.0.23 PassengerDefaultRuby /usr/bin/ruby </IfModule> After you restart Apache, you are ready to deploy any number of web applications on Apache, with a minimum amount of configuration! Press ENTER when you are done editing. |
インストールはこれで完了です。
Redmineのログのローテーション
Redmineのログは、
/var/lib/redmine/log/production.log
です。
このログはデフォルトではローテーションされないようです。
よって、ローテーションの設定を行います。
/etc/logrotate.d/redmine
というファイルを作成します。
中身は次のように記述しておきます。
|
1 2 3 4 5 6 |
/var/lib/redmine/log/*log { missingok notifempty copytruncate compress } |
Redmineの起動
ApacheでVirtual Hostを設定します。
/etc/httpd/conf.d/redmine.conf
というファイルを作成します。
|
1 2 3 4 5 6 7 8 9 10 11 12 13 14 15 16 17 18 19 20 21 22 23 24 25 26 27 28 29 30 31 32 33 34 35 36 37 38 39 40 41 42 43 |
<VirtualHost *:80> LoadModule passenger_module /usr/local/share/gems/gems/passenger-5.0.23/buildout/apache2/mod_passenger.so <IfModule mod_passenger.c> PassengerRoot /usr/local/share/gems/gems/passenger-5.0.23 PassengerDefaultRuby /usr/bin/ruby </IfModule> # Passengerが追加するHTTPヘッダを削除するための設定(任意)。 # Header always unset "X-Powered-By" Header always unset "X-Rack-Cache" Header always unset "X-Content-Digest" Header always unset "X-Runtime" # 必要に応じてPassengerのチューニングのための設定を追加(任意)。 # 詳しくはPhusion Passenger users guide(http://www.modrails.com/documentation/Users%20guide%20Apache.html)をご覧ください。 PassengerMaxPoolSize 20 PassengerMaxInstancesPerApp 4 PassengerPoolIdleTime 3600 PassengerHighPerformance on PassengerStatThrottleRate 10 PassengerSpawnMethod smart RailsAppSpawnerIdleTime 86400 PassengerMaxPreloaderIdleTime 0 ServerName (サーバー名) DocumentRoot /var/lib/redmine/public RailsBaseURI /redmine LogLevel warn ErrorLog logs/redmine_error_log CustomLog logs/redmine_access_log combined <Directory /> Options FollowSymLinks AllowOverride All Require all granted </Directory> </VirtualHost> |
これでMariaDBとApacheを再起動します。
ブラウザから、
http://(サーバー名)
で以下のように表示されました。
初期ログイン名とパスワードは、
admin/admin
です。
日本語環境でRedmineを使う
日本語環境で読みやすいRedmine用テーマとして、
farend basic、
farend fancy
があります。
farend basic
URL: https://github.com/farend/redmine_theme_farend_basic/tags (GitHub)
次の特徴があります。
- ¥記号を正しく表示
日本語フォントを優先して使用するよう設定を行いました。これにより、¥記号がバックスラッシュとして表示されていた問題が解決します(WindowsおよびメイリオがインストールされているMacのみ)- メイリオフォントを優先表示
メイリオフォントがインストールされていればメイリオで文字が表示されます。MS Pゴシックと比較して画面上の文字が読みやすくなります。- 文字色を読みやすく調整
文字と背景のコントラストを高めて読みやすくするために、文字の色を全体的に見直しました。- フォントサイズの調整
一部メニューの文字の大きさを大きくしました。- 優先度に応じたチケットの色分け表示
チケット一覧画面において優先度に対応した色分け表示を行うための設定をRedmine標準添付のAlternateテーマから取り込みました。- 期限が超過したチケットを色付きで表示
チケット一覧画面において期限が超過したチケットをオレンジ色で表示するよう変更しました。- 自分の名前を太字で表示
チケット一覧画面において担当者・作者欄の自分の名前を太字で表示するよう変更しました。
farend fancy
farend basicの派生テーマです。
URL: https://github.com/farend/redmine_theme_farend_fancy/downloads (GitHub)
テーマのインストール
テーマのインストール方法は、テーマのzipファイルを展開して、以下のフォルダにおくだけです。
/var/lib/redmine/public/themes/
その後、画面から、
「管理」→「設定」→「表示」画面内の項目「テーマ」で
「Farend basic」を選択、
画面最下部の「保存」ボタンをクリックしてください。
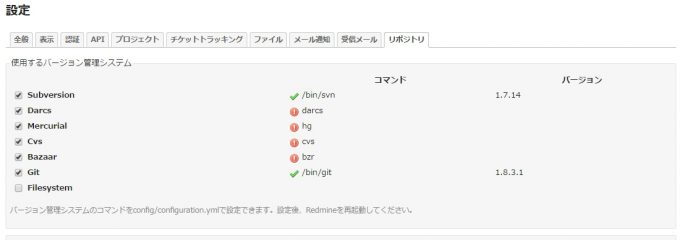
SubversionやGitなどのバージョン管理システムと連携
Redmineは外部にある
バージョン管理システム、Subversion、Darcs、Mercurial、Cvs、Bazaar、Git
と連携することが出来ます。
設定するには、
/var/lib/redmine/config/configuration.yml
を編集します。
SubversionとGitと連携したい場合は、/bin/svnや/bin/gitが実行できることを確認して、以下のように設定しておきます。
|
1 2 3 4 5 6 |
scm_subversion_command: /bin/svn scm_mercurial_command: scm_git_command: /bin/git scm_cvs_command: scm_bazaar_command: scm_darcs_command: |
svnやgitがない場合は、yumでインストールする必要があります。
ここで、SCMとは
ソフトウェア構成管理(ソフトウェアこうせいかんり、software configuration management、SCM)
です。
この後、Apacheを再起動するだけで、SubversionやGitと連携できます。
ちゃんと連携できると以下のように表示されます。
注意点として svn+ssh:// を使用しているリポジトリにアクセスする場合、svn+sshをnon-interactiveに設定する必要があります。
この設定がないと、404エラーが発生します。
これはRedmineサーバーから以下のコマンドを実行するのと同じことを行っているからです。
コマンドラインから以下のコマンドを実行できないといけません。
|
1 |
$ svn list --xml svn+ssh://example.com/var/svn/repos/hoge/trunk |
エラーが発生する時、/var/lib/redmine/log/production.log には以下のログが吐き出されます。
|
1 2 3 4 |
Error parsing svn output: #<REXML::ParseException: No close tag for /lists/list> /usr/share/ruby/rexml/parsers/treeparser.rb:28:in `parse' /usr/share/ruby/rexml/document.rb:287:in `build' /usr/share/ruby/rexml/document.rb:43:in `initialize' |
この対策にはsshで鍵認証を行うよう設定が必要です。
sshの鍵認証については以下にまとめました。

私のサーバーの場合、以下のように設定しました。
Redmineサーバ:
- redmineのディレクトリ所有者は「redmine」に設定
- redmineユーザで鍵作成(パス無し)とする
これでPassengerもredmineユーザーで実行されるようになります。
svnサーバ:
- redmineユーザを作成(Redmineサーバでのredmineディレクトリの所有者と同じに)
- Redmineサーバーで作成した公開鍵を、redmineユーザに設置
まとめ
Redmineのインストールは前提ソフトが多く意外に面倒でした。
良さそうな本は何さつもありました。
さくらのVPSサーバー
↓月額685円からの低価格&高パフォーマンスのVPS、さくらのVPSはコチラ
SSDプランが月々685円から使える!さくらのVPS







コメント